The RegExpValidator class enables a programmer to use a regular expression for validating a field. You pass a regular expression to the validator by using the expression property, and additional flags to control the regular expression pattern matching by using the flags property. The process of the validation becomes successful when the validator finds a match of the regular expression in the field to validate; otherwise, an error occurs.
It is used to dispatch the valid and invalid events. The event object is an instance for an invalid event of the validationResultEvent class. It holds an array of validationResult objects. doValidation() is a protected method of the RegExpValidator class. It is used to override of the base class doValidation() method to validate a regular expression. Following are the public properties of the RegExpValidator class:
expression: It is used for validation.
flags: It is used when the validator finds a match.
noExpressionError: It is an error message. It occurs when there is no regular expression specified.
noMatchError: It is an error message. It occurs when there are no matches to the regular expression.
Adobe Flex is a software development kit released by Adobe Systems for the development and deployment of cross-platform rich Internet applications based on the Adobe Flash platform. The Flex platform has dominant media players that support rich media. Besides that, Adobe Flex is also lighter and works without being installed. It also creates SWF files rendered by the Adobe Flash Player. The 9A0-082 Adobe Certified Expert (ACE) certification is developed for programmers, web applications developers, and other development professionals who want to demonstrate proficiency with single or multiple Adobe products.
Key Objectives of the exam
This certification exam mainly tests your ability in the following areas:
1. Creating a User Interface (UI)
This objective primarily focuses on the following sub objectives:
Identify and describe the basic UI controls used in a Flex application and identify the purpose of UI containers and when to use them.
Change the look and feel of a design by using API styles, style sheets, filters, blends and dynamically change the look of an application by using view states, transitions, and effects.
Position UI elements by using constraint-based layout and enhanced constraints.
Implement application navigation by using navigator containers and customize list-based controls.
2. Flex system architecture and design
This objective primarily focuses on the following sub objectives:
Create and use custom components and transfer data between components by using data bindings.
Create, handle, and dispatch custom events and handle framework events.
List and describe the differences between model, view, and controller code in a Flex application.
3. Programming Flex applications with ActionScript
This objective primarily focuses on the following sub objectives:
Define and extend an ActionScript class, implement an ActionScript interface and use access modifiers with classes and class members.
Under the purpose of and implement data transfer objects, implement accessor methods in ActionScript and use an ArrayCollection to sort, filter, and provide data.
Implement data validation and manipulate XML data by using E4X.
4. Interacting with data sources and servers
This objective primarily focuses on the following sub objectives:
Implement simple LiveCycle Data Services (LCDS) messaging and data management.
Create, connect to, and define a local database and add, update, and remove records from local database.
Interact with remote data and services by using Remote Procedure Call (RPC) services and upload files to a server.
5. Using Flex in the Adobe Integrated Runtime (AIR)
This objective primarily focuses on the following sub objectives:
Given a scenario, compile, export a release build of an AIR application and create, populate, delete files and directories on a local file system.
Create and customize native windows, menus, and adding drag-and-drop functionality to and from the desktop.
Install, uninstall, and update an AIR application and list, describe the AIR security contexts.
Number of Questions
The exam consists of 50 multiple-choice questions. The 9A0-082 exam is in linear format.
How much I have to score to pass the exam?
You have to score 67% to pass the exam.
Duration of the Exam
The duration of the 9A0-082 exam is 85 minutes.
Are there any Pre-Requisites for the 9A0-082 Adobe Flex 3 With AIR exam?
The candidates who wish to take this Adobe Flex 3 with AIR exam, they have to take only one test, i.e., 9A0-082 exam to achieve the Adobe Flex 3 certification. Although there are no prerequisites for this certification, it would be helpful if they have hands on experience using the Adobe Flex 3.
Why should I earn Adobe Flex 3 (9A0-082) Certification ?
There are numerous advantages of becoming a Adobe Flex 3 Certification. I can cover some key points here:
Adobe Flex 3 is most broadly and openly used technology in the current era and the 9A0-082 certification approves your expertise on the Flex 3 products and technology.
Candidates who are already earned the Adobe Flex 3 With AIR (9A0-082) certification are considered as top favorites by the employers and also the No.1 choice for the job and they also get preference in promotions.
Adobe Flex 3 provides a vast range of facilities to its users, such as allowing a user to choose different containers and layout managers to lay out contents, and uses different types of panels and windows.
Adobe Flex 3 technology provides a wider area of safe and secure jobs from Adobe Flex Developer, Adobe Flex Coder, Senior Software Systems Engineer – Adobe Flex with ActionScript 3.0, ADOBE FLEX ARCHITECT, Adobe Flex Programmer to LiveCycle Developer III.
This versatile certification provides you prospects for a variety of job roles and you have to just pass just one test i.e. 9A0-082 to achieve this certification.
How Much Is The Exam Fees?
The Fee for taking Adobe Flex 3 with AIR 9A0-082 exam is US$150.
Where To Take The Exam?
The candidates may get register themselves at Pearson VUE testing center to take the exam. After you purchase your exam voucher, you can contact an authorized Pearson VUE center to schedule your exam date, time, and location. You can book the exam within one year from the date of purchase of the voucher. The exam date may depend on your choice (and availability of slot) in your selected test center.
What is the exam retake policy?
If you do not pass in the 9A0-082 exam, you will have to purchase a new exam voucher to retake the exam. There is no wait time fixed between the two attempts.
A function is a set of actions defined by a user, which affects one or more objects as per the definition. The function block starts with the function keyword. Functions, once created, can be reused in other parts of the document. The syntax for defining a function is as follows:
function functionname()
{
..
....
.......
}
Some important function are listed below:
array_slice() function
The array_slice() function is used to extract a large piece of an array. The syntax of the array_slice() function is as follows:
array array_slice ( array $array , int $offset [, int $length [, bool $preserve_keys = false ]] )
the parameter can be defined as,
Option
Description
array
It is the input array.
offset
If offset is positive, the sequence starts from that offset in the array. If offset is negative, the sequence starts from the end of the array.
length
If the length is omitted, array_slice() assumes that the user wants all elements from the starting position onward returned.
preserve_keys
When this option is used, array_slice() preserves the keys and does not reorder them.
array_shift() function
The array_shift() function is used to remove and return the first element of an array passed to it as an argument. It is used mainly to create a queue and act on it until the queue is empty. The array_shift() function either returns the shifted value of an array, or returns the NULL value if array is empty or argument passed is not an array.
array_merge() function
The array_merge() function is used to merge two or more arrays by combining all their elements. If the input arrays have the same index keys, the later value for that key overwrites the previous one. If arrays contain keys in numeric form, the later value for that key appends the index keys instead of overwriting it.
array_intersect() function
The array_intersect() function extracts all the elements that are common for two or more arrays. Since this function only checks whether the values are the same, the index keys of arrays are ignored. Let's take an example to understand this:
The output of the above script will be array(3) { ["'a'"]=> int(20) [0]=> int(30) [1]=> int(35) } since three elements (20, 30, 35) are common in both arrays, i.e., $array1 and $array2.
sort() function
The sort() function is used to sort a given array either alphabetically if any strings are present or numerically if all elements are numbers. However, a user cannot pass an associative array to the sort() function. The reason behind this is that the values of the array are sorted as expected but keys are replaced by numerical indices that follow the sort order.
asort() function
The asort() function accepts an associative array and sorts its values either alphabetically if any strings are present or numerically if all elements are numbers. However, the asort() function preserves the array keys.
ksort() function
The ksort() function accepts an associative array and sorts its keys either alphabetically if any strings are present, or numerically if all elements are numbers. However, it does not sort the elements of the associative array.
A cookie is a message given to a Web browser by a Web server. The browser stores that message in a small text file .Each time the same computer requests a page with a browser, the cookie is sent back to the server too. You can do number of things with cookies. They are used to store information about user, visited pages, poll results and etc. The main purpose of cookies is to identify users and possibly prepare customized Web pages for them.
Generally cookies are used only to store small amounts of data. Websites can read the values from the cookies and use the information as desired. In addition to the information it stores, each cookie has a set of attributes that helps ensure the browser sends the correct cookie when a request to a server is made.
Even though cookies are not harmful some people do not permit cookies due to concerns about their privacy. In this case you have to use Sessions.
How to Create a Cookie?
PHP cookies can be set using the setcookie() function. The syntax is as follows:
$name - It is used to define the cookie name. The name of each cookie sent is stored in the superglobal array $_COOKIE.
$value - It is used to define the cookie value. It is associated with the cookie name.
$expire - It denotes the time after which the cookie should expire in seconds
$path - It specifies the exact path on the domain that can use the cookies.
$domain - The domain that the cookie is available. If not domain is specified, the default value is the value of the domain in which cookie was created.
$secure - It is used to specify whether the cookie will be sent via HTTPS. A value of 1 specifies that the cookie is sent over a secure connection but it doesn't mean that the cookie is secure. It's just a text file like every other cookie. A value of 0 denotes a standard HTTP transmission.
Creating a cookie with setcookie
<?php
setcookie("username", "David", time()+3600);
?> <html> <body>
…
……
…………
……………… </body> </html>
Cookie username is set with value David which is set to expire after one hour on users computer.
The function time() retrieves the current timestamp. Appending 3600 seconds (one hour) to the current time to make the cookie to expire after one hour.
Note: A cookie must be set before any HTML code as shown above.Cookies work within HTTP, it's important that you send all cookies before any output from your script. This requires that you place calls to this function before any output, including tags as well as any white space. If you don't do this, PHP will give you a warning and your cookies will not be sent.
Creating a permanent cookie
Lets create a cookie which is set to last for 1 year.
Now the cookie is set and we need to retrieve the information. As mentioned above the name of each cookie sent by your server accessed with the superglobal array $_COOKIE. In the example below we retrieve the value of the cookie and print out its value on the screen.
<?php echo $_COOKIE["username"];
?>
Output => David
How to Delete a Cookie?
By default, the cookies are set to be deleted when the browser is closed. We can override that default by setting a time for the cookie's expiration but there may be occasions when you need to delete a cookie before the user closes his browser, and before its expiration time arrives. To do so, you should assure that the expiration date is in the past. The example below demonstrates how to do it (setting expiration time 1 minute ago):
In PHP a function is a predefined set of commands that are carried out when the function is invoked. In addition to being able to write your own functions, PHP has a number of predefine functions for you to use. In function, the interpreter simply starts at the beginning and works its way to the end in a linear fashion. In the real world, this simple approach is rarely practical; for example, you might want to perform a certain operation more than once in different portions of your code. To do so, PHP supports a facility known as a function.
Functions must be declared using the following syntax:
function function_name ([param1], [param 2])
In PHP each function is assigned a name and can receive one or more than one parameters. The parameters exist as variables throughout the execution of the entire function.
Simple function with a parameter:
<?php
function square ($sqr)
{
return $sqr * $sqr;
}
$my_sqr = 50;
echo square ($my_sqr);
?>
The $sqr variable is created whenever the square function is called and initialized with the value passed to it. The return statement is used to return a value from the
function, which later on passes to the calling script. Normally, parameters are passed by some value, this means that, in the previous example, a copy of the $my_sqr variable is placed in the $sqr variable when the function begins, and any changes to the newly generated variable in the function body does not affects former value. But you can overcome this situation by passing a parameter by reference so that any changes performed within the function will also be reflected to the former value. In passing the reference it not only passes the value but also the reference for that value.
<?php
function square (&$my_sqr)
{
$my_sqr += 10;
return $my_sqr * $my_sqr;
}
$sqr = 50;
echo square ($sqr);
?>
You can also assign a default value to any of the parameters of a function when declaring it. This way, if the caller does not provide a value for the parameter, the default one will be used instead:
<?php
function square ($my_sqr = 50)
{
return $my_sqr * $my_sqr;
}
echo square ();
?>
In this case, because no value has been passed for $sqr, the default of 50 will be used by the interpreter. Note that you can’t assign a default value to a parameter passed by reference.
Scope of Functions and Variable
It’s significant to point out that there is no connection between the name of a variable declared inside a function body and any equivalent variables declared outside of it. In PHP, variable scope works differently from most other languages so that what resides in the global scope is not automatically available in a function’s scope. It can be stated more clearly from the following example:
<?php
function square ()
{
$sqr += 10;
return $sqr * $sqr;
}
$sqr = 50;
echo square ();
?>
In this case, the script assumes that the $sqr variable, which is part of the global scope, will be automatically included in the scope of square(). However, this does not take place, so $sqr has a value of Null inside the function, resulting in a return value of 0. If you want to import global variables inside a function’s scope, you can do so by using the global statement:
<?php
function square ()
{
global $sqr;
$sqr += 10;
return $sqr * $sqr;
}
$years = 50;
echo square ();
?>
The $sqr variable is now accessible to the function, where it can be used and modified. Note that by importing the variable inside the function’s scope, any changes made to it will be reflected in the global scope as well—in other words, you’ll be accessing the variable itself, and not an ad hoc copy as you would with a parameter passed by value.
Functions with Variable Parameters
You can also know about the number and types of parameter passed to a particular function. For this you have to just create a function that accepts a variable number of arguments using a number of functions that PHP makes available for you:
func_num_args() returns the number of parameters passed to a function.
func_get_arg($arg_num) returns a particular parameter, given its position in the parameter list.
func_get_args() returns an array containing all the parameters in the parameter list.
As an example, let’s write a function that calculates the arithmetic average of all the parameters passed to it:
<?php
function class_avg()
{
$arg = func_num_args();
if ($arg == 0)
return 0;
$total = 0;
for ($i = 0; $i < $arg; $i++)
$total += func_get_args($i);
return $total / $arg;
}
echo class_avg (89, 44, 64, 49, 75, 90);
?>
In the preceding example, we started the script by determining the number of arguments and if there is no argument then we are exiting immediately from the function. The reason behind this is that the last instruction would cause a division-by-zero error. Further, we create a for loop that simply cycles through each parameter in sequence, adding its value to the sum. At last, we calculate and return the average value by dividing the sum by the number of parameters. Note how we stored the value of the parameter count in the $arg variable—we did so in order to make the script a bit more efficient because otherwise we would have had to perform a call to func_get_args() for every cycle of the for loop. That would have been rather wasteful because a function call is quite expensive in terms of performance and the number of parameters passed to the function does not change during its execution.
Variable Variables and Variable Functions
PHP supports two very useful features known as variable variables and variable functions.
The former allows you use the value of a variable as the name of a variable. Sound confusing? Look at this example:
<?php
$x = 100;
$y = ‘x’;
echo $$y;
?>
When this script is executed and the interpreter encounters the $$y expression, it first determines the value of $y, which is the string a. It then reevaluates the expression with a substituted for $y as $x, thus returning the value of the $x variable. Similarly, you can use a variable’s value as the name of a function:
<?php
function odd_number ($x)
{
echo “$x is odd”;
}
function even_number ($x)
{
echo “$x is even”;
}
$n = 15;
$a = ($n % 2 ? ‘odd_number’ : ‘even_number’);
$a($n);
?>
At the end of the script, $a will contain either odd_number or even_number. The expression $a($n) will then be evaluated as a call to either odd_number() or even_number(). Variable variables and variable functions can be tremendously valuable and convenient. However, they tend to make your code obscure because the only way to really tell what happens during the script’s execution is to execute it—you can’t determine whether what you have written is correct by simply looking at it. As a result, you should only really use variable variables and functions when their usefulness outweighs the potential problems that they can introduce.
A loop is a sequence of instruction s that is continually repeated until a certain condition is reached. Loops are basically types of control construct. Loops can be combined so that they are executed at the same time, thus improving the run-time efficiency. Loops save the time of the computers by setting a single code for recurring tasks. They are good because once they are compiled they run over and over again until they reach their limit. Hence resulting in improved efficiency. PHP also supports the following loops:
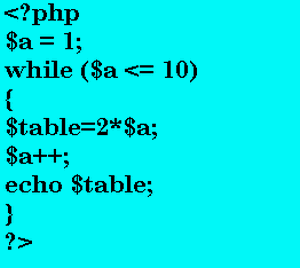
The while Structure
A while statement executes a code block until a condition is set:
This prints the table of 2. The instructions written inside the While Loop continues to execute until the value of $a exceeds 10.
Infinite loops are usually not a good thing, but, because PHP provides the proper mechanism for interrupting the loop at any point, they can also be useful.
In this block of code, the (true) condition is always satisfied and, therefore, the compiler will be more than happy to go on repeating the code block forever. Inside the code block itself, we perform two if-then conditions, and the second one is dependent on the first so that the $b > 50 will only be evaluated after $a > 100, and, if both are true, the break statement will cause the execution point to exit from the loop into the preceding scope. Naturally, we could have written this loop just by using the condition ($a <=100 && $b <= 50) in the while loop, but it would have been less efficient because we’d have to perform the check twice. (Remember, $b doesn’t increment unless $a is greater than 100.) If the second condition were a complex expression, our script’s performance might have suffered.
The do-while Structure
The major problem with the while() loop is that, if the condition never evaluates to True, the statements inside the code block are never executed. In some cases, it might be preferable that the code be executed at least once, and then the condition evaluated to determine whether it will be necessary to execute it again.
This can be achieved in one of two ways: either by copying the code outside of the while loop into a separate code block, which is inefficient and makes your scripts more difficult to maintain, or by using a do-while loop:
In this above block of code, $a will be printed once even after the condition is false ($a is not less that 10) because we are using do-while loop which executes the statements written inside the do while loop at least one time even if the condition is false.
The For Loop
The statements in the for loop repeat continuously for a specific number of times. The while and do-while loops repeat until a certain condition is met. The for loop repeats until a specific count is met. You can use a for loop when the number of repetition is know, or can be supplied by the user.
As you can see, the declaration of a for loop is broken in to three parts:
The first expression is known as start Expression. It is evaluated before the loop begins. This start Expression is evaluated only once at the beginning of the loop.
The second represents the condition that must be satisfied for the loop to continue. Finally, the third contains a set of instructions that are executed once at the end of every iteration of the loop before the condition is tested.
Naturally, you can also create a for loop that is infinite in a number of ways, in fact. You could omit the second expression from the declaration, which would cause the interpreter to always evaluate the condition to true. You could omit the third expression and never perform any actions in the code block associated with the loop that will cause the condition in the second expression to be evaluated as true. You can even omit all three expressions using the form for(;;) and end up with the equivalent of while(true).
You can also use while loop inside the For Loop. This can be illustrated more clearly from the following example:
By executing the above block of code it will print the table from 1 to 10.
There are different types of operators in PHP. Variables, constants, and data types will not be very beneficial to you until you can’t merge and manipulate them in a numerous ways. In PHP, it can be done easily by using operators. PHP recognizes several classes of operators, depending on what purpose they are used for. We can list the operators as follows:
The Assignment Operator
The assignment operator '=' is used to assign a value to a variable:
$x = 65;
$y = “Joseph is a good boy”;
It’s vital to understand that, by default, variables are assigned by value. This means that by doing following:
$x = $y
It will assigns the value of $y to $x. But, if you change $y after assigning, $x will remain the same. Sometimes you don't want to do this and want that when you change the value of $y, it is also been reflected in $x. You can do it easily by assigning to $x a reference to $y:
$x = &$y
Any change to $y will now also be reflected in $x.
Arithmetic Operators
The next operator in this category is Arithmetic operators. These operators are used to do arithmetic calculations like addition, subtraction etc. Arithmetic operators are always been used in binary operations (means that they always include two operators):
Addition (+)
Subtraction (-)
Multiplication (*)
Division (/)
Modulus (%)
In PHP modulus operation works a bit different from the typical mathematical operation as it returns a signed value rather than an absolute one. PHP also inherits 4 special incrementing/decrementing operators from the C language.
The prefix incrementing operator ++ increases the value of the variable that succeeds it, and then returns its new value. For example, ++$x will firstly increase the value of $x by 1 and then return it.
The postfix incrementing operator ++ returns the value of the variable that pre-cedes it, and then increments its value. For example, $x++ will instantly returns the value of $x and after that it increases the value of $x by 1 for the next operation.
The prefix decrementing operator --decrements the value of the variable that succeeds it, and then returns its new value. For example, --$x will first decreases the value of $x and then returns it.
The postfix decrementing operator -- returns the value of the variable that precedes it, and then decrements its value. For example, $x-- will instantly returns the value of $x and after that it decreases the value of $x by 1 for the next operation.
There is always a great confusion in between these operators, but if you follow a simple rule then it wil be very easy for you. The rule is that if the variable is placed after the operator (Prefix version) then you must increase or decrease the value first.
But if the variable is placed before the operator (Postfix version) then you must returns the value first and after that increase or decrease the value of the variable.
Bitwise Operators
The next operator in this category is Bitwise operator. It manipulates the value of variables at the bit level:
The bitwise AND (&) operation causes the value of a bit to be set if it is set in both the left and right operands.
For example, 1 & 1 = 1, whereas 1 & 2 = 0
The bitwise OR (|) operation causes the value of a bit to be set if it is set in either the left or right operands.
For example, 1 | 1 = 1 and 1 | 2 = 3
The bitwise XOR (^) operation causes the value of a bit to be set if it is set in either the left or right operands, but not in both.
For example, 1 ^ 1 = 0, 1 ^ 0 = 1
The bitwise NOT (~) operation causes the bits in its operand to be reversed—that is, set if they are not and unset otherwise. The bitwise left-shift (<<) and right-shift (>>) operators actually shift the bits of the left operands left or right by the number of positions specified by the right operand.
Comparison Operators
The next operator in this category is Comparison operator. Comparison operators are used to establish the relationship between two operands. The result of a comparison is always a Boolean value:
The = = operator determines if two values are equal. For example:
$x = = $y where both $x and $y are equal to 10
The != operator determines if two values are different. For example:
$x != $y where $x = 15 and $y=18
The < operator determines whether the left operand’s value is less than the right operand’s. For example:
$x < $y where $x = 25 and $y=67
The > operator determines whether the left operand’s value is greater than the right operand’s. For example:
$x > $y where $x = 85 and $y=62
The <= operator determines whether the left operand’s value is less than or equal to the right operand’s. For example:
$x <= $y where $y = 85 and $x=85 or less than 85
The >= operator determines whether the left operand’s value is greater than the right operand’s. For example:
$x >= $y where $x = 28 and $y=28 or less than 28
Logical Operators
The next operator in this category is Logical operator. Logical operators are generally used in conjunction with comparison operators to create complex decision process. They also return a Boolean result:
The AND operator (indicated by the keyword and or by &&) returns True if both the left and right operands cannot be evaluated to False. For example:
($x < $y) && ($x > $z )
returns true if $x = 25 , $y=67 and $z=10
The OR operator (indicated by the keyword or or by ||) returns True if either the left or right operand cannot be evaluated as False. For example:
($x < $y) || ($x > $z )
returns true if $x = 25 , $y=67 and $z=90
The XOR operator (indicated by the keyword xor) returns True if either the left or right operand can be evaluated as True, but not both. For example:
($x < $y) || ($x > $z )
returns False if $x = 25 , $y=67 and $z=15
The unary NOT operator (indicated by !) returns False if the operand can be evaluated as True, and True otherwise.
Precedence of PHP Operators
Operator precedence determines the grouping of terms in an expression. Certain operators have higher precedence than others; for example, the multiplication operator has higher precedence than the addition operator:
For example x = 8 + 6 * 9; Here x is assigned 62, not 126 because operator * has higher precedence than + so it first get multiplied with 6*9 and then adds into 8.
You can easily understand the precedence of operators with the following table:
I found a very useful video describing page caching in Zend Server and I want to share it with all of you. In the following video,you can learn how to set up a page caching rule in Zend Server 5 in order to optimize performance in a demo PHP application. This is very simple instead of writing the application with caching in mind. I am sure that this video will surely help you and increase your knowledge.
The Zend PHP5 ZCE certification is designed to test the level of knowledge and web programming of a candidate using PHP language. Before taking the Zend 200-500 exam, you should practice the following:
You should thoroughly understand PHP syntax, operators, variables, constants, functions, and arrays in order to achieve good marks.
You should practice and understand OOPS modifiers/inheritance, interfaces, and exceptions.
You should know how to implement static methods and properties, and autoload.
Practice on configuring and managing session security.
You should be able to perform cross-site scripting and cross-site request forgeries.
You should also learn how to mitigate SQL injection, remote code injection, and email injection.
You should thoroughly learn and understand XML basics, simple XML, XML extension, and Xpath.
You should also practice and understand Web services basics.
You should know how to implement SOAP and REST.
You should be able to perform string searching, replacing, and formatting.
You should analyze SQL queries and prepared statements.
You must be able to perform GET and POST data.
You should know how to implement cookies and HTTP headers.
You should practice to perform files reading and writing.
You must be able to learn and understand file system functions and streams.
I am here to provide you with every clinch of knowledge about certification exams and its impact on your career. Any certification exam will boost your career and take it to new heights. I will describe to you with every bit and bytes of detail about certification exams.
You can also leave your Questions at itexams.expert@hotmail.com